How To Start Seeds For Hydroponics: Guide for Beginners

Key Takeaways
- Successful hydroponic gardens begin with proper seed germination techniques using mediums like rockwool cubes, rapid rooter plugs, or paper towel methods.
- Environmental factors such as temperature (70-75°F), humidity (70-90%), and pH-balanced water (5.5-6.5) are critical for optimal seed germination in hydroponics.
- Most common hydroponic seed starting failures come from overwatering, improper lighting, and incorrect pH levels, which are all easily preventable.
- Transplanting seedlings at the right time (when 2-3 true leaves appear) significantly improves plant success rates in hydroponic systems.
- Seeds N Such provides expert guidance and quality supplies for starting your hydroponic garden journey with confidence and ensuring healthy plant development.
Why Seed Starting Makes or Breaks Your Hydroponic Garden
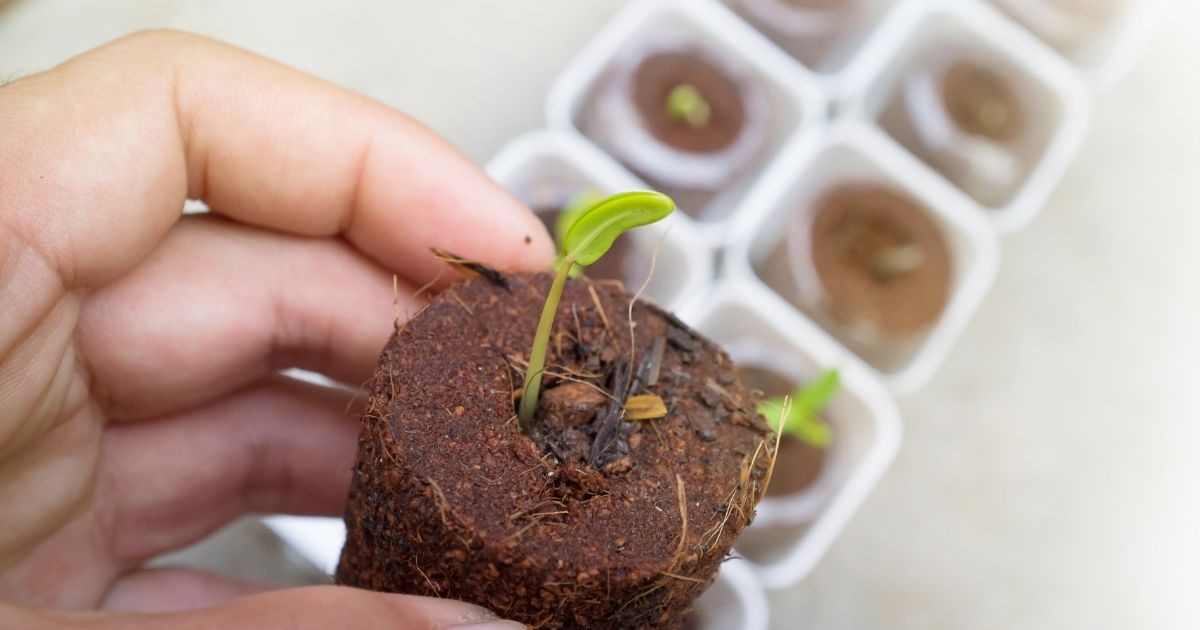
“How to Successfully Germinate Seeds for …” from hygrozyme.com and used with no modifications.
The first few days of a seed’s life determine its entire future. In hydroponics, this statement couldn’t be more true – proper germination sets the foundation for robust plants that will thrive in your soilless system. Unlike traditional gardening where soil can compensate for minor mistakes, hydroponic seed starting requires precision from day one.
The difference between stunted plants that struggle and vibrant crops that produce abundantly often traces back to how you started those tiny seeds. When germinated correctly, seedlings develop strong root systems that efficiently absorb nutrients once transferred to your hydroponic setup. Poor germination techniques, on the other hand, create weak plants that never reach their full potential.
Many beginners make the critical mistake of treating hydroponic seed starting like traditional soil gardening. But the specialized environment of hydroponics demands specific approaches to humidity, moisture levels, and growing mediums that differ significantly from soil-based methods. Seeds N Such has observed that growers who master proper germination techniques experience up to 30% better yields and significantly fewer plant health issues throughout the growing cycle.
Essential Supplies for Hydroponic Seed Starting

“How to Transplant Seedlings in a …” from nthydroponics.com and used with no modifications.
Before you drop your first seed into water, you’ll need to gather specific supplies designed for hydroponic germination. The right materials make all the difference between struggling seedlings and robust plants ready for your system. Think of these supplies as your seed-starting toolkit – each serving a crucial purpose in creating the perfect environment for germination.
Growing Mediums That Work Best
Unlike soil gardening, hydroponic seed starting requires specialized growing mediums that provide both support and optimal moisture balance. The ideal medium holds enough water for germination without becoming waterlogged and suffocating your seeds. Rockwool cubes remain the industry standard due to their excellent water retention and air-to-water ratio that creates the perfect environment for developing roots.
Other effective options include coco coir, which offers excellent water retention while providing good aeration and a neutral pH that won’t interfere with delicate seedlings. Rapid rooter plugs, made from composted organic materials, provide another excellent alternative with their perfect balance of moisture retention and drainage. For beginners, starter kits containing pre-sized rockwool cubes in humidity trays offer the simplest path to successful germination.
Containers and Trays You’ll Need
- Germination trays with humidity domes to maintain consistent moisture levels
- Net pots in various sizes (1.5″, 2″, and 3″) for different plant types
- Seedling cell trays with drainage holes for organized growing
- Reservoirs or shallow containers for bottom-watering techniques
- Clear plastic covers or wrap to create mini-greenhouses
The containers you choose should match your chosen germination method. For rockwool cubes, standard 1020 nursery trays with humidity domes provide the perfect environment. When using the paper towel method, shallow containers with lids maintain humidity while allowing easy seedling removal. Investing in quality trays with proper drainage prevents common issues like damping off and root rot that often plague beginning hydroponic gardeners.
Light Sources for Optimal Germination
While many seeds can germinate in darkness, providing the right light immediately after sprouting is crucial for preventing leggy, weak seedlings. Full-spectrum LED grow lights positioned 6-12 inches above your seedlings provide the ideal light spectrum without the excessive heat that can dry out delicate seedlings. For smaller setups, specialized seed-starting lights that clip onto shelving units offer an affordable entry point.
The intensity and duration of light directly impact seedling health. Most hydroponic seedlings benefit from 14-16 hours of light daily, followed by a crucial dark period that allows for proper plant development. Adjustable-height light fixtures allow you to maintain the optimal distance as seedlings grow, preventing both light stress from positioning too close and stretching from insufficient light intensity.
Step-by-Step Seed Starting Methods

“Propagate Seedlings In Hydroponics …” from franshydroponics.com.au and used with no modifications.
Now that you understand the importance of proper seed starting and have gathered your supplies, let’s dive into the most effective methods for germinating seeds for hydroponics. Each technique has its advantages, and you may find that certain methods work better for specific plant types. The key is consistency and close monitoring during these critical first days.
1. Rockwool Cube Method
The rockwool cube method is the gold standard for hydroponic seed starting. Begin by soaking your rockwool cubes in pH-adjusted water (aim for 5.5-6.0) for at least 30 minutes to thoroughly saturate them. This pre-soaking step removes any manufacturing residues and creates the perfect moisture level for germination.
Once soaked, gently squeeze excess water from each cube – they should be damp, not dripping. Make a small hole about ¼ inch deep in the top of each cube using a toothpick or pencil tip. Place 1-2 seeds in each hole, then lightly cover with a tiny piece of the rockwool. Arrange your seeded cubes in a humidity tray, cover with the dome, and place under gentle light or in a warm, semi-lit location.
Check your cubes daily to monitor moisture levels and germination progress. Most seeds will sprout within 2-7 days depending on the plant variety. Once seedlings emerge, gradually increase light exposure and begin removing the humidity dome for increasing periods to harden off your seedlings before transplanting to your hydroponic system.
2. Paper Towel Germination Technique
For seeds that are particularly small or slow to germinate, the paper towel method offers excellent visibility and control. Moisten two sheets of paper towel with pH-adjusted water until they’re damp but not soggy. Place your seeds on one half of the paper towel, spacing them about an inch apart to prevent root tangling. Fold the other half over to cover the seeds, then place the entire setup in a ziplock bag or between two plates to maintain moisture.
Store your paper towel setup in a warm location (70-75°F) and check daily for germination. Once tiny roots emerge (typically 1/4 inch long), carefully transfer each sprouted seed to your chosen growing medium, placing the root downward and the seed hull just below the surface. This method works exceptionally well for lettuce, herbs, and other small seeds that benefit from careful handling.
3. Rapid Rooter Plug Approach
Rapid Rooter plugs offer an excellent balance of convenience and success rates, especially for beginners. These ready-to-use plugs are made from composted organic materials and provide the perfect environment for seed germination with minimal preparation. Simply insert one seed into the pre-made hole in each plug, then place the plugs in a humidity tray with about ¼ inch of water in the bottom.
The plugs will wick up just the right amount of moisture, creating perfect conditions for germination. Cover with a humidity dome and place in a warm location with gentle light. Rapid Rooter plugs maintain ideal moisture levels more consistently than some other methods, reducing the risk of drying out or overwatering during the critical germination stage.
4. Direct Seeding in Net Pots
For larger seeds like beans, peas, and cucumbers, direct seeding into net pots filled with growing medium can be highly effective. Fill each net pot with your chosen medium (expanded clay pellets, coco coir, or a mix of both), leaving about an inch of space at the top. Create a depression in the center about twice the depth of the seed’s diameter. Place 2-3 seeds in each pot, then lightly cover with more growing medium.
Place the filled net pots in a shallow tray with about ½ inch of pH-adjusted water. The medium will wick moisture upward to the seeds, promoting germination. This method minimizes transplant shock since the seedlings remain in the same container from germination through harvest, making it especially suitable for plants with delicate root systems or those that don’t transplant well.
Perfect Environmental Conditions for Seed Success

“Smart Grow Germination kit 10 planter …” from www.wehydroponics.com and used with no modifications.
Controlling the environment around your germinating seeds is perhaps the most critical factor in hydroponic seed starting success. Even with the right supplies and methods, improper environmental conditions can lead to weak germination or complete failure. Pay careful attention to these factors to maximize your germination rates and seedling health.
Temperature Sweet Spots
Most hydroponic seeds germinate best when consistently maintained between 70-75°F (21-24°C). This temperature range activates enzymes within the seed that trigger the germination process while preventing the growth of harmful pathogens. Investing in a simple heating mat with temperature control can make a tremendous difference in germination success rates, especially during cooler months or in air-conditioned spaces.
Be aware that temperature fluctuations can significantly impact germination. Seeds experiencing temperature swings may germinate inconsistently or not at all, which is why placing your trays in a location free from drafts and direct sunlight is essential. For heat-loving plants like peppers and tomatoes, maintaining temperatures at the higher end of the range (75-80°F) can boost germination rates by up to 30%.

Humidity Levels That Boost Germination
The ideal humidity range for most hydroponic seed germination falls between 70-90%, significantly higher than typical room humidity. This elevated moisture level helps soften the seed coat and provides the consistent water contact needed for embryonic development without drowning the seed. Humidity domes over seedling trays are essential for maintaining these levels, creating a mini greenhouse effect that holds moisture around your developing seeds.
Water Quality Considerations
Water quality plays a far more significant role in hydroponic seed starting than many beginners realize. Chlorinated tap water can inhibit germination, while hard water may create mineral deposits on growing mediums that interfere with root development. The best approach is using filtered water with a pH adjusted to between 5.5 and 6.5, creating optimal conditions for nutrient absorption once roots develop. Testing your water and making necessary adjustments before soaking any growing medium ensures you’re providing the cleanest possible start for your seeds.
Common Mistakes That Kill Hydroponic Seedlings
“Hydroponic Germination Rates …” from university.upstartfarmers.com and used with no modifications.
Even experienced hydroponic growers occasionally struggle with seedling issues. Understanding the most common pitfalls can help you avoid frustration and seedling loss. Most seedling failures stem from just a handful of preventable mistakes that, once mastered, will dramatically improve your success rates.
Overwatering Issues
Surprisingly, the most common seed-starting mistake in hydroponics is overwatering. While hydroponics is water-based, seeds actually need a delicate balance of moisture and oxygen during germination. Too much water creates anaerobic conditions where roots can’t breathe, leading to rot and fungal problems. The ideal growing medium should feel damp to the touch, not soggy or dripping wet.
When using rockwool cubes or similar media, ensure they’re properly squeezed after initial soaking to remove excess water. For ongoing moisture, bottom watering techniques—where water is added to the tray rather than directly to the cube—allows growing media to wick up just the right amount of moisture. Monitor your seedlings daily, only adding water when the growing medium begins to feel lighter or slightly dry to the touch.
Light Position Problems
Positioning lights incorrectly is another frequent seedling killer. Lights placed too far away cause seedlings to stretch toward the light source, resulting in weak, leggy plants with fragile stems that can’t support themselves. Conversely, lights positioned too close can create heat stress, burning delicate seedling leaves or drying out growing media too quickly.
The ideal light height varies by light type, but generally, LED grow lights should be positioned 6-12 inches above seedlings, while fluorescent lights can be placed 2-4 inches away. As seedlings grow, regularly adjust light height to maintain the proper distance. Watch for visual cues of light stress: stretching indicates insufficient light, while curled or bleached leaves suggest light intensity is too high.
Wrong pH Levels
Hydroponic seedlings are extremely sensitive to pH imbalances, yet many beginners overlook this critical factor. When pH levels fall outside the optimal range (5.5-6.5 for most plants), seedlings can’t absorb essential nutrients even when those nutrients are present in the water. This leads to deficiencies that manifest as yellowing leaves, stunted growth, or complete failure to thrive.
Invest in a digital pH meter rather than relying on color-changing test drops for greater accuracy. Check and adjust the pH of your water before soaking any growing medium, and regularly test the runoff water from your seedling trays to catch pH drift early. Most hydroponic supply stores offer pH up and pH down solutions that allow for precise adjustments to maintain the perfect environment for your developing seedlings.

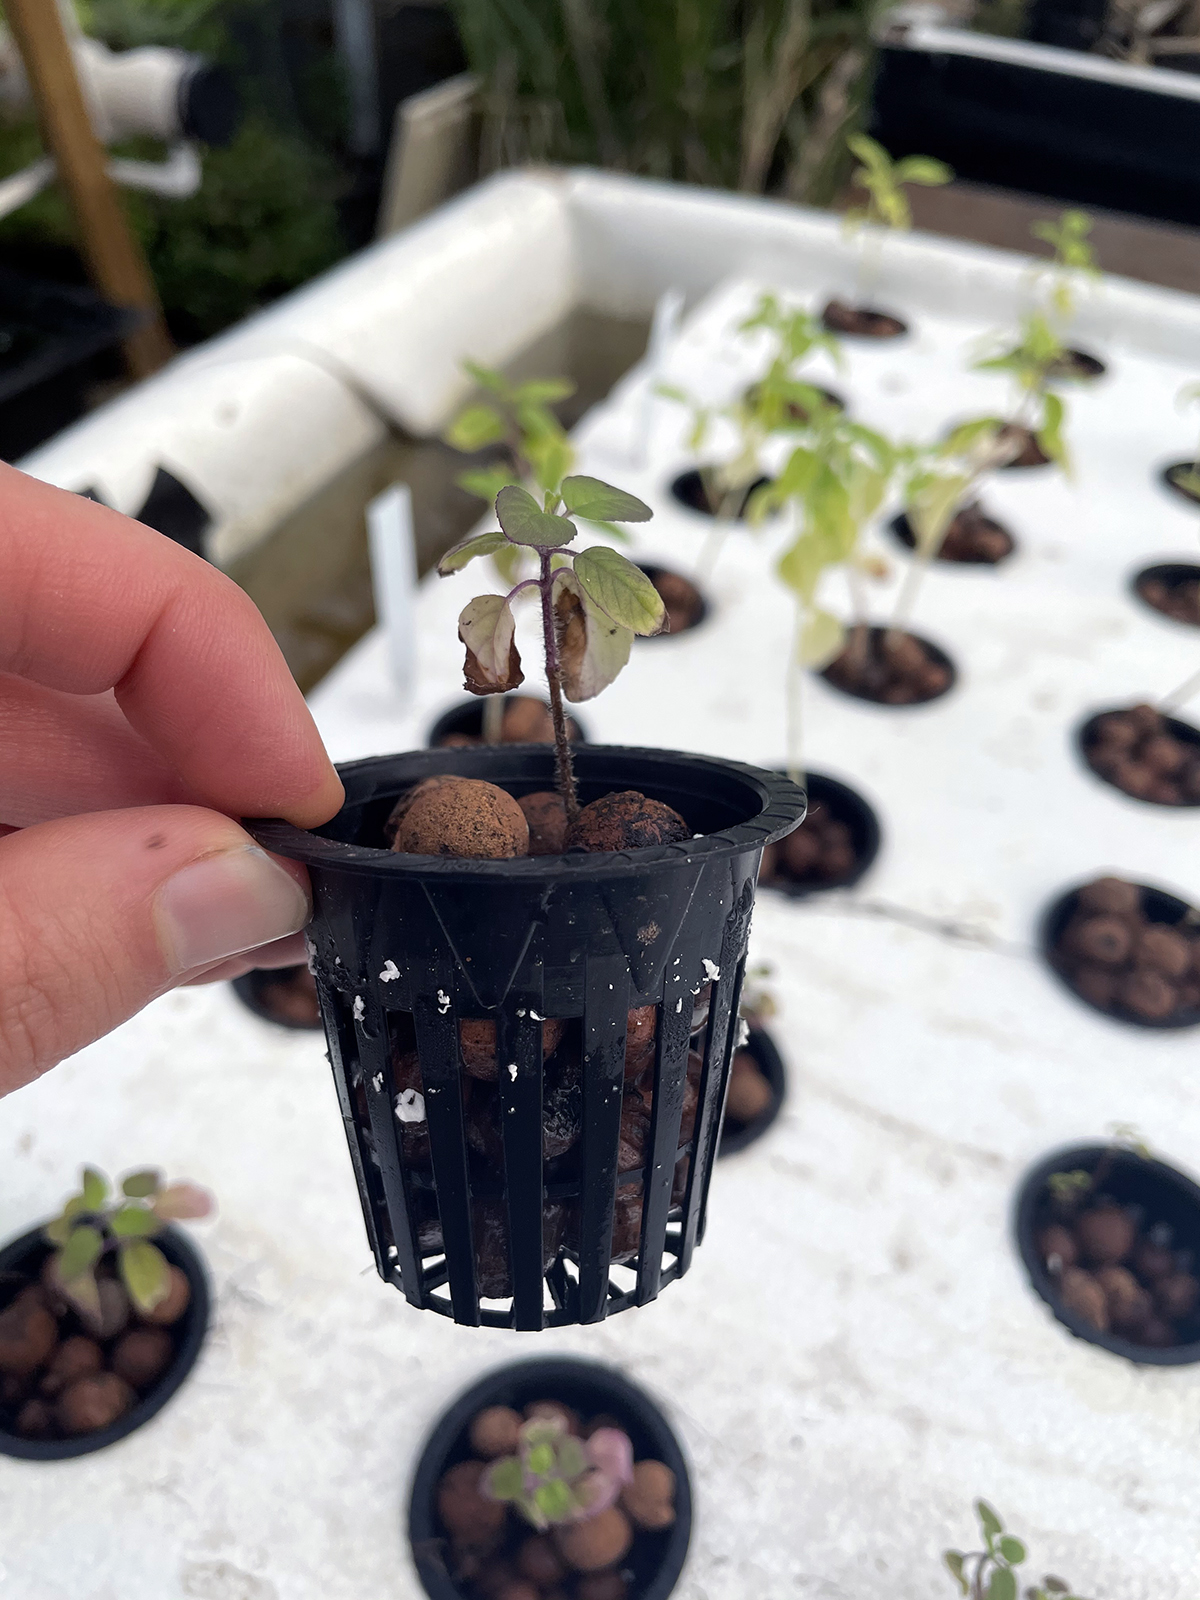
When and How to Transplant Seedlings to Your System
Signs Your Seedlings Are Ready
Knowing exactly when to transplant your seedlings into your main hydroponic system can make the difference between thriving plants and transplant shock. Look for seedlings with 2-3 sets of true leaves (not counting the initial seed leaves or cotyledons) as the first indicator of readiness. The roots should be visible emerging from the bottom of your growing medium but not extensively wrapped around it – this indicates a well-established but not root-bound seedling.
The overall appearance of your seedlings provides additional clues – they should stand upright without support, display vibrant color, and show new leaf growth at the center. Most seedlings reach the transplant stage between 2-4 weeks after germination, depending on the plant species and growing conditions. Waiting for these clear signs of readiness ensures your seedlings have developed sufficient root systems to handle the transition to your hydroponic setup.
Proper Transplanting Steps
Transplanting requires gentle handling to prevent root damage and minimize shock. Begin by preparing your hydroponic system at least 24 hours before transplanting – fill reservoirs, adjust pH and nutrient levels, and ensure pumps and timers are functioning correctly. For most systems, a half-strength nutrient solution is ideal for newly transplanted seedlings, allowing them to adjust gradually to higher nutrient concentrations.
When moving seedlings from their starting trays, never pull them by the stems. Instead, gently remove the entire growing medium with the seedling intact. If using rockwool cubes, they can transfer directly into net pots with additional growing medium (like expanded clay pellets) surrounding them for support. Water your newly transplanted seedlings immediately with nutrient solution at the correct pH to help them establish in their new environment.
First Week Care After Transplant
The first seven days after transplanting represent the most vulnerable period for your seedlings. During this time, maintain higher humidity levels than normal by misting plants several times daily or using humidity domes that can be gradually removed. Reduce light intensity slightly during this period by raising lights higher than normal, then gradually lowering them back to standard operating heights as plants show signs of new growth.
Monitor nutrient solution levels and pH daily during this critical adjustment period, as newly transplanted seedlings may uptake water and nutrients at different rates than established plants. Watch closely for any signs of stress such as wilting or leaf discoloration, which indicate adjustments may be needed to help your plants transition successfully. Most seedlings will show visible new growth within 3-5 days after a successful transplant, signaling they’ve adapted to their new environment. For more detailed guidance, consider this step-by-step guide on germinating seeds for hydroponics.
Best Seeds for Beginner Hydroponic Growers
“Small-scale hydroponics | UMN Extension” from extension.umn.edu and used with no modifications.
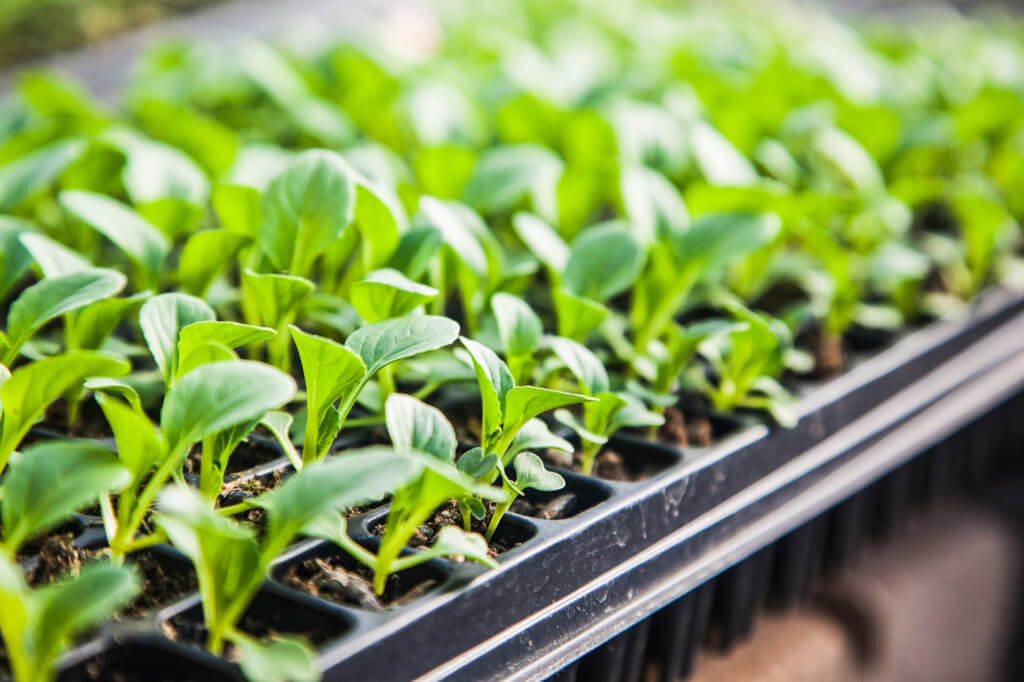
Fast-Growing Leafy Greens
Leafy greens are the perfect starting point for hydroponic beginners due to their quick growth cycles and relatively simple needs. Lettuce varieties like Butterhead, Romaine, and loose-leaf types typically go from seed to harvest in just 30-45 days, providing nearly instant gratification. These plants thrive in cooler nutrient solutions (65-70°F) and can produce abundantly even under modest lighting conditions, making them ideal for indoor setups.
Spinach and kale also perform exceptionally well in hydroponic systems, offering nutrient-dense harvests with minimal maintenance. For beginners, “cut and come again” varieties allow multiple harvests from the same plants – simply cut the outer leaves while leaving the growing center intact. This approach maximizes your yield from each successful seedling and provides a continuous harvest over several weeks rather than a single picking.
Herbs That Thrive in Water
Fresh herbs command premium prices at grocery stores but grow effortlessly in hydroponic systems. Basil stands as the undisputed champion of hydroponic herbs, growing vigorously with minimal care and producing aromatic leaves within weeks of transplanting. A single well-maintained basil plant can provide dozens of harvests over many months, making it both economical and rewarding.
Mint, cilantro, and parsley also excel in hydroponic systems, though each has specific preferences. Mint loves slightly cooler water temperatures, while cilantro benefits from higher light levels to prevent stretching. When starting herb seeds, be patient with varieties like parsley and dill that naturally take longer to germinate – sometimes up to 14 days. Using the paper towel method for these slower-germinating herbs allows you to monitor progress and ensure viable seeds before committing to growing medium space.
Vegetables Worth Trying First
While leafy greens and herbs offer quick success, several vegetable varieties also perform exceptionally well in hydroponic systems for beginners. Compact varieties of cherry tomatoes adapted for container growing provide abundant harvests in hydroponic setups without the extensive pruning and training required by larger tomato varieties. Look for determinate or dwarf varieties specifically bred for smaller spaces to maximize your chances of success.
Peppers, particularly smaller varieties like habaneros and serranos, adapt well to hydroponics and produce significantly higher yields than soil-grown counterparts. Cucumbers bred for greenhouse production, often labeled as “European” or “seedless” varieties, also thrive hydroponically and can produce dozens of fruits from a single plant over an extended harvest period. All these vegetables benefit from starting with high-quality seeds specifically selected for hydroponic or greenhouse conditions.
Troubleshooting Seed Starting Problems
Even when following best practices, occasional issues can arise during seed starting. Most problems fall into predictable patterns with straightforward solutions. If seeds fail to germinate, first check temperature consistency – fluctuations below 65°F or above 85°F significantly reduce germination rates. Old or improperly stored seeds may have reduced viability; always use fresh seeds from reputable suppliers and store extras in cool, dry conditions. For seedlings that emerge but then develop problems, examine your light levels (stretching indicates insufficient light), check for consistent moisture without waterlogging, and ensure your growing medium’s pH remains in the optimal 5.5-6.5 range. Most seed starting failures can be remedied by making small adjustments to these fundamental factors. For more detailed steps, you can refer to this step-by-step guide.
Your Hydroponic Garden’s Next Steps
Once your seedlings are successfully transplanted and growing in your hydroponic system, maintain consistent monitoring of nutrient levels, pH, and solution temperature to ensure continued success. Gradually increase nutrient strength as plants mature, and implement regular cleaning routines to prevent algae buildup or pathogen development in your system. Document your successes and challenges with each plant variety to build a personalized knowledge base for future growing cycles. Remember that hydroponics offers unparalleled control over growing conditions – by mastering the seed starting process outlined here, you’ve already overcome the most challenging hurdle to building a productive, year-round indoor garden with Seeds N Such’s expert guidance and supplies.
Frequently Asked Questions
How long does it take for hydroponic seeds to germinate?
Germination times vary significantly by plant species, even in optimal hydroponic conditions. Fast-germinating seeds like lettuce, basil, and most brassicas typically sprout within 2-3 days when kept at 70-75°F with proper moisture. Medium-speed germinators including tomatoes and peppers generally emerge in 5-7 days. Slower species like parsley, celery, and some herbs may take 10-14 days or longer. Temperature fluctuations can significantly extend these timeframes, which is why maintaining consistent warmth using seed heating mats can dramatically improve both germination speed and success rates.
Can I use regular garden seeds for hydroponics?
Yes, most standard garden seeds will grow in hydroponic systems, though results may vary. Seeds marketed specifically for hydroponics or greenhouse growing are often selected for traits that excel in soilless environments, such as disease resistance, compact growth habits, and efficient nutrient uptake. These specialized seeds may offer higher success rates and better yields in hydroponic settings.
When using regular garden seeds, look for varieties labeled as suitable for container growing, as these typically have more compact growth habits better suited to indoor hydroponic environments. Avoid treated seeds with fungicides or other coatings, as these chemicals can potentially disrupt the delicate balance of your hydroponic system.
Do I need nutrients during the germination phase?
No, nutrients are not only unnecessary during germination but can actually inhibit the process. Seeds contain all the nutrients needed to sprout and develop their first true leaves. Adding nutrient solution too early can create excess salinity around the seed that interferes with water uptake and can damage emerging roots. Wait until seedlings have developed their first true leaves (not the initial seed leaves or cotyledons) before introducing a very dilute nutrient solution at approximately quarter-strength. Gradually increase nutrient concentration as plants develop more leaves and stronger root systems.
What’s the biggest difference between soil and hydroponic seed starting?
The most significant difference lies in moisture management and growing media characteristics. Soil provides a buffer for moisture and nutrients that’s much more forgiving than hydroponic media. In soil, seeds benefit from naturally occurring beneficial microorganisms and a more stable moisture gradient, while hydroponic starting requires precise control over humidity, water contact, and growing media properties.
Another major difference is the transplant process. Soil-started seedlings undergo significant root disturbance during transplanting, while properly managed hydroponic seedlings can transfer to final systems with minimal root disturbance. This reduced transplant shock is a major advantage of hydroponic seed starting when done correctly.
The sterile environment of hydroponic seed starting also eliminates many soil-borne diseases that can plague traditional seedlings. However, this sterility means hydroponically grown seedlings lack exposure to beneficial microorganisms found in soil, making them potentially more vulnerable to pathogens unless beneficial microbes are intentionally introduced to the system.
- Hydroponic seedlings generally develop faster than soil-grown counterparts
- Hydroponic starting requires more precise environmental control
- Water quality and pH are more critical in hydroponic seed starting
- Transplant shock is typically less severe with properly grown hydroponic seedlings
- Soil provides natural disease suppression that must be managed differently in hydroponics
Understanding these fundamental differences helps explain why techniques that work well in soil may fail in hydroponics, and why specialized approaches to hydroponic seed starting yield superior results.
How many seeds should I start for each plant I want to grow?
For most hydroponic crops, starting 2-3 seeds per growing position provides optimal germination insurance without wasting space or seeds. This approach accounts for natural variations in germination rates while ensuring you’ll have viable seedlings for each spot in your system. After emergence, select the strongest seedling and carefully remove the others to prevent competition for light and resources.
Factors affecting this recommendation include seed quality, age, and species-specific germination rates. For seeds with known high germination rates (95%+) or expensive specialty varieties, a 1:1 ratio may be sufficient. Conversely, for older seeds or varieties with naturally lower germination percentages, starting 3-4 seeds per position provides better insurance. Most seed packets list expected germination rates, which can guide your decision.
Consider staggering your seed starting schedule rather than planting everything at once. This succession planting approach ensures continuous harvests and allows you to refine your techniques based on each batch’s results. For a system with 12 growing positions, starting seeds for 4 positions weekly creates a perpetual garden cycle where plants at various growth stages are always developing, maximizing your system’s productivity and providing a steady supply of fresh produce.