DIY Grow Light Setup for Indoor Hydroponics: Step-by-Step Tutorial

Key Takeaways
- DIY grow light setups can save you up to 60% compared to commercial systems while providing optimal light spectrum for indoor plants
- The ideal DIY setup requires full-spectrum LED lights placed 12-24 inches above plants, running for 12-16 hours daily
- Light intensity needs vary dramatically by growth stage – seedlings need 100-300 PPFD while flowering plants require 600-900 PPFD
- A proper height-adjustable system with timer controls is essential for preventing light burn and maintaining healthy growth cycles
- Specific grow light spectrum combinations (blue/red/white) stimulate different plant responses and can significantly improve yields
Growing plants indoors without proper lighting is like trying to bake a cake without heat. Your regular home lighting simply won’t cut it when it comes to growing healthy, productive plants hydroponically. While standard household bulbs might keep your living room bright, they lack the specific light spectrum and intensity that plants crave for photosynthesis. Let me show you how to build a DIY grow light system that rivals commercial setups at a fraction of the cost.
Indoor plants require far more light than most people realize – typically 10-100 times more intense than standard home lighting. Without sufficient light energy, your plants will stretch, weaken, and ultimately produce disappointing results. Verda Garden’s modular grow light system has revolutionized how home gardeners approach indoor lighting, but if you’re looking to build your own custom solution, this guide will walk you through creating an effective DIY setup that meets your specific growing needs.
Most failed indoor gardens trace back to inadequate lighting – not problems with nutrients or watering schedules. The science is clear: plants need specific light wavelengths in sufficient quantities to trigger proper growth responses. Building your own grow light system gives you complete control over these critical factors while keeping your budget intact.
Why Your Plants Need Better Light Than Your Home Provides
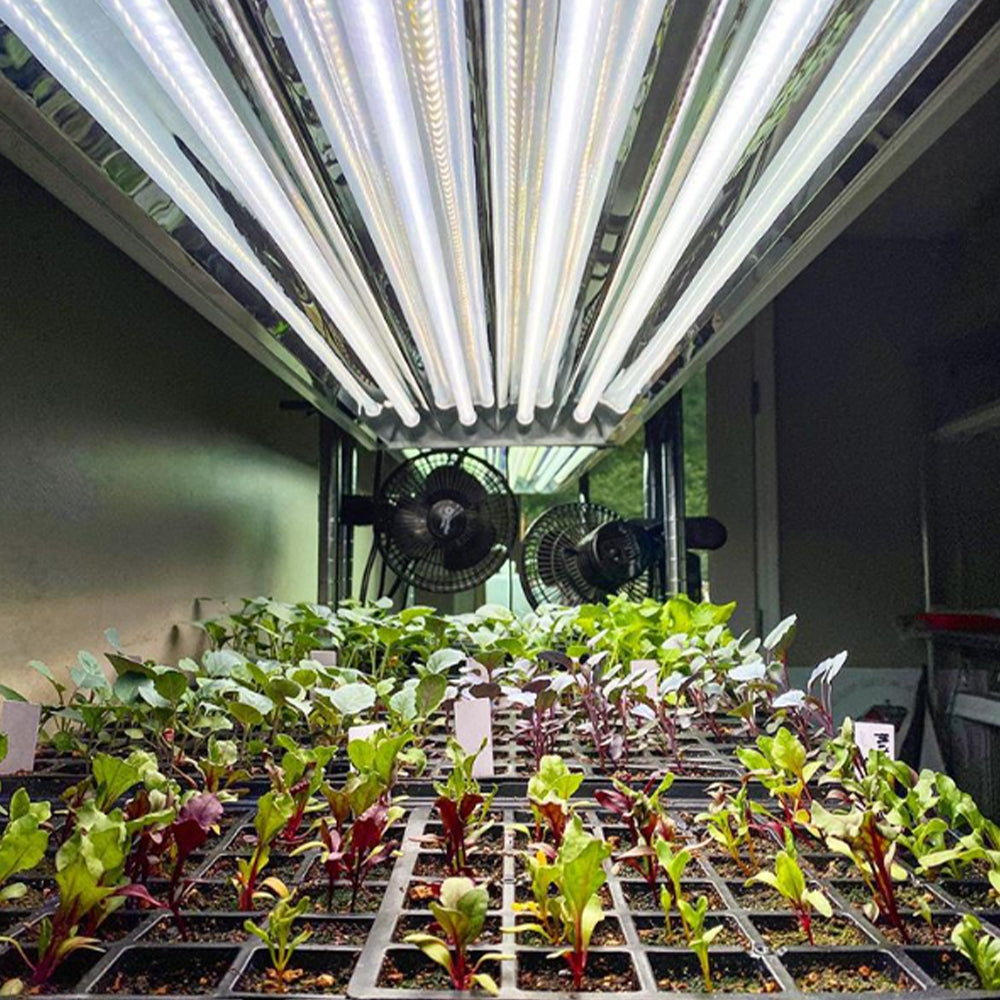
“T5 HO Ballast Bypass 4FT LED Grow Lamp …” from activegrowled.com and used with no modifications.
Your houseplants might survive under standard indoor lighting, but hydroponically grown edibles need significantly more. Regular household bulbs emit light primarily in the yellow-green spectrum – precisely the wavelengths plants reflect rather than absorb. Plants evolved to utilize the abundant red and blue light wavelengths from the sun, which trigger specific growth responses in their cellular structure.
Even placing plants directly on a sunny windowsill only provides about 5-10% of the light intensity of direct outdoor sunlight. Most fruiting and flowering plants require a minimum of 6 hours of direct, unfiltered sunlight daily – something virtually impossible to achieve indoors without supplemental lighting. Without proper light intensity, measured in PPFD (Photosynthetic Photon Flux Density), your plants will develop weak stems, pale leaves, and minimal fruit production.
Standard fluorescent lights emit primarily blue wavelengths, which promote vegetative growth but do little for flowering or fruiting. Incandescent bulbs produce mostly red light but run extremely hot and inefficient. This is why purpose-built grow lights combining specific wavelengths at the right intensities are crucial for successful indoor growing.
Essential Components for a DIY Grow Light System
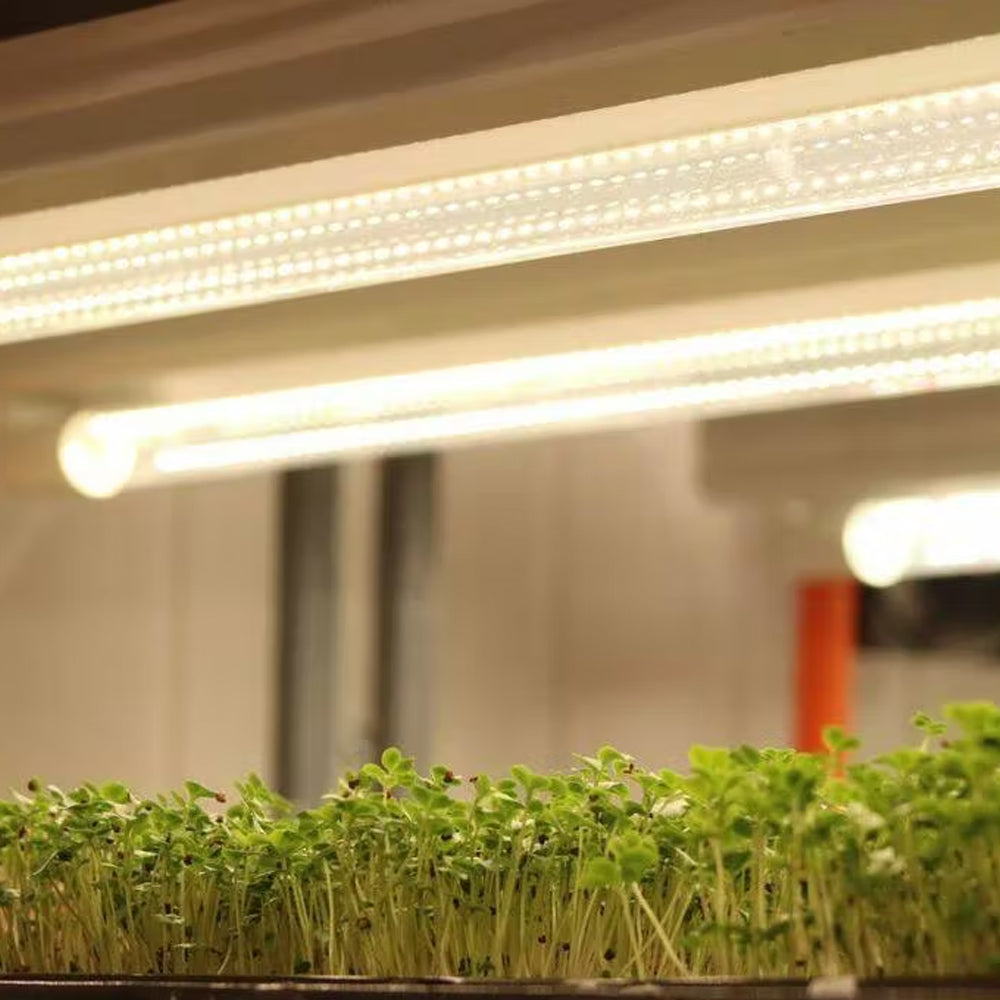
“T8 HO 4FT LED Grow Lamp (40W Eqv …” from activegrowled.com and used with no modifications.
Creating an effective grow light system requires understanding the core components that will determine your success. Each element plays a specific role in creating the optimal growing environment for your plants. By properly selecting and integrating these components, you’ll maximize growth while minimizing unnecessary expenses. For a comprehensive guide on setting up your own system, check out this brief guide to indoor grow lights.
The foundation of any DIY grow light setup includes appropriate light fixtures, plant-specific bulbs, a reliable hanging system for height adjustment, and timer controls for automatic light cycles. You’ll also need proper electrical connections that can safely handle the power requirements of your system. These components work together as a system, so weaknesses in any area will compromise your overall results. For more insights on setting up your system, check out this guide on hydroponics explained.
Light Fixtures: Which Type Works Best
When selecting fixtures for your DIY grow light setup, you’ll need to balance cost, efficiency, and effectiveness. The fixture housing matters less than what it can safely support, but there are definite advantages to purpose-designed options. Standard shop light fixtures can work for basic seedling growth but typically lack the reflective properties and heat dissipation needed for more light-hungry plants.
T5 fluorescent fixtures have been the budget standard for years, offering decent efficiency for leafy greens and herbs. However, modern LED fixtures have revolutionized indoor growing by dramatically increasing efficiency while reducing heat output. For true DIY versatility, aluminum channel fixtures designed for LED strip lights offer the best combination of affordability, heat management, and customization potential.
Whatever fixture type you choose, ensure it includes proper reflectors to direct light downward toward your plants rather than dispersing it in all directions. Proper reflection can increase your effective light intensity by 20-40% without requiring additional electricity.
Bulbs That Actually Grow Plants (Not Just Any LED Will Do)
Not all “grow light” bulbs deserve the name. Many budget options marketed as plant lights lack the specific spectrum plants need for proper development. For optimal growth, you’ll need bulbs that provide the right combination of blue light (400-500nm wavelength), which promotes vegetative growth, and red light (600-700nm), which triggers flowering and fruiting.
Full-spectrum white LED grow lights have become the gold standard for home growers, offering an excellent balance of efficiency and effectiveness. When examining specifications, look for lights with a high CRI (Color Rendering Index) of 90+ and an appropriate Kelvin temperature between 3000K-4000K for flowering plants or 5000K-6500K for vegetative growth. The most important metric, however, is PPFD (Photosynthetic Photon Flux Density), which measures the actual usable light reaching your plants. For more information on optimizing your grow setup, consider the differences between a grow tent vs. greenhouse.
For a truly effective DIY setup, I recommend high-quality Samsung or Epistar LED diodes which offer the best combination of efficiency, spectrum, and lifespan. The Viparspectra P1000 offers excellent PPFD values of 740 μmol/m²/s at 12″ height in a 2’x2′ area, making it significantly more effective than standard shop lights while using less electricity.
Hanging System Options for Proper Height Adjustment
Light Distance Recommendations by Plant Stage
Seedlings/Clones: 24-30″ above plants (100-300 PPFD)
Vegetative Growth: 18-24″ above plants (300-600 PPFD)
Flowering/Fruiting: 12-18″ above plants (600-900 PPFD)
The ability to adjust your light height is crucial for successful indoor growing. Plants need different light intensities at different growth stages, and the proper hanging system makes these adjustments simple. The ideal system allows for easy raising and lowering of lights without tools or complicated mechanisms.
Ratchet hangers represent the simplest and most reliable option for DIY setups. These inexpensive devices allow single-handed height adjustments in small increments, with easy locking at any position. For multi-light setups, a cross-bar system using lightweight EMT conduit creates a stable platform from which multiple lights can hang while still allowing height adjustment of the entire array simultaneously. If you’re interested in expanding your hydroponic knowledge, you might want to explore how big hydroponic plants can get.
Another practical option, especially for shelf-based growing systems, is adjustable chain or rope hangers. These basic systems allow manual height adjustments by moving links between hooks. Whatever system you choose, ensure it can support the full weight of your lights with a minimum 2x safety margin. For more insights on optimizing your indoor setup, explore our guide on venting grow tents.
Timer and Control Options
Consistent light cycles are essential for plant development, making timers a non-negotiable component of your grow light system. Basic mechanical outlet timers cost under $15 and work well for simple setups, allowing you to set daily on/off cycles without manual intervention. For more sophisticated control, digital programmable timers offer multiple on/off periods throughout the day, perfect for simulating natural dawn/dusk transitions. To ensure optimal growth conditions, consider using a grow tent temp and humidity controller in conjunction with your lighting system.
Smart plugs represent the most versatile option for modern growers, allowing remote control via smartphone apps and integration with voice assistants like Alexa or Google Home. These devices typically cost $15-30 but offer unprecedented convenience and monitoring capabilities. Some even track your electricity usage, helping you optimize energy efficiency while ensuring your plants receive consistent lighting schedules even when you’re away from home.
Building Your DIY Grow Light Setup in 5 Easy Steps

“Hydroponics Grow Lights …” from cultiuana.com and used with no modifications.
Creating your own grow light system doesn’t require specialized skills – just careful planning and basic tools. The process can be completed in a single afternoon, transforming an ordinary space into a high-yield indoor garden. By following these steps systematically, you’ll avoid common pitfalls that lead to inadequate lighting or safety hazards.
Before starting construction, gather all materials and tools to streamline the assembly process. You’ll need wire cutters, screwdrivers, measuring tape, and possibly a drill depending on your mounting method. Having everything prepared beforehand prevents delays and ensures proper fit of all components. Remember that proper preparation prevents the frustration of discovering missing parts midway through your build.
1. Calculate Your Light Coverage Needs
Before purchasing any equipment, determine exactly how much growing space you need to illuminate. Measure your growing area’s width and length in feet, then multiply these dimensions to calculate your square footage. Most grow lights specify their effective coverage area, typically ranging from 2×2 feet for smaller units to 4×4 feet for larger ones. For dense plantings or light-hungry plants like tomatoes or peppers, aim for 30-50 watts of actual LED power per square foot.
Remember that light intensity decreases dramatically as distance increases. A light that provides 800 μmol/m²/s at 12 inches might only deliver 200 μmol/m²/s at 24 inches – insufficient for flowering plants. When calculating coverage, always base your measurements on the manufacturer’s PPFD maps at your intended hanging height. Underestimating your light requirements is the most common mistake in DIY setups, resulting in stretched, underproducing plants. For more insights on plant growth, explore how big hydroponic plants can get.
2. Assemble Your Light Fixture Frame
For most DIY setups, a simple frame constructed from 1-inch PVC pipe or lightweight aluminum provides an ideal structure for mounting your lights. Cut your pipes to create a rectangle slightly larger than your growing area, then connect them using standard corner fittings. For added stability, consider adding cross-braces if your frame exceeds 3 feet in any dimension. This simple frame allows for easy mounting of multiple light fixtures while maintaining proper spacing between them.
If using a wire shelving unit as your growing space, you can often attach lights directly to the undersides of shelves using zip ties or S-hooks, eliminating the need for a separate frame. Whatever mounting system you choose, ensure it can support the full weight of your lights with a significant safety margin. Test the stability of your frame before attaching any electrical components to prevent accidents or damage.

3. Install and Connect Your Light Fixtures
Once your frame is ready, mount your light fixtures according to the manufacturer’s instructions. For most LED panels, this involves attaching hanging clips or carabiners to pre-drilled holes or brackets. Position fixtures to provide even coverage across your growing area, avoiding dark spots or excessive overlap. In larger setups, stagger your fixtures in a grid pattern to maximize uniformity of light distribution.
For electrical connections, use proper grounded outlets and avoid overloading circuits. Most home circuits are rated for 15-20 amps, so calculate your total power draw to ensure you stay within safe limits. For multiple fixtures, consider using a power strip with built-in circuit protection. Always leave sufficient slack in your power cords to accommodate height adjustments, but secure excess cabling to prevent entanglement with your hanging system.
4. Create an Adjustable Hanging System
Attach your ratchet hangers or adjustable chains to sturdy anchor points on your ceiling, grow tent frame, or shelf system. Each light should be supported by at least two hanging points to prevent tilting. For ceiling installations, use appropriate anchors rated for at least twice the weight of your fixtures. Drywall anchors are typically insufficient for heavier LED panels, so locate ceiling joists or use toggle bolts for secure mounting.
Test your height adjustment system before attaching lights, ensuring smooth operation through the full range of motion you’ll need. Properly installed ratchet hangers should allow single-handed adjustment while maintaining a secure lock at any position. Position your lights initially at the height recommended for your plants’ current growth stage, but be prepared to adjust as plants develop and their light requirements change.
5. Set Up Your Timer and Test the System
Connect your grow lights to your timer rather than directly to wall outlets, ensuring the timer is properly configured for your desired light schedule. Most plants thrive on 16-18 hours of light during vegetative growth and 12 hours during flowering. Program your timer accordingly, and verify it correctly switches the lights on and off at the scheduled times. For digital timers, don’t forget to set the current time and day first, as this serves as the reference point for scheduling. To learn more about optimizing your grow space, check out this guide on grow tent temperature and humidity control.
Before introducing plants to your new lighting system, run a 24-hour test to ensure all components function properly. Monitor for any unusual heating, flickering, or electrical issues. Use a light meter app on your smartphone to check light distribution, identifying and correcting any dark spots by adjusting fixture positioning. This testing phase is critical for identifying potential problems before they can affect your plants.
Budget-Friendly DIY Grow Light Options
Not every garden requires top-of-the-line lighting solutions. Depending on what you’re growing and your budget constraints, several DIY options can provide excellent results without breaking the bank. The key is matching your light choice to your specific plants’ requirements rather than assuming more expensive equals better results.
When evaluating budget options, focus on actual light output rather than marketing claims. Many inexpensive “grow lights” advertise high wattage figures that refer to “equivalent” output rather than actual power consumption. Always check the actual power draw (true watts) and, if possible, the PPFD values at your intended hanging distance. Remember that efficiency matters more than raw power – modern LEDs deliver more usable plant light per watt than older technologies. For a deeper understanding of efficiency, consider exploring the importance of controlling temperature and humidity in your grow environment.
Repurposed Shop Lights ($30-50)
For starting seeds and growing low-light plants like herbs and leafy greens, modified shop lights can provide adequate illumination. Standard T5 or T8 fluorescent fixtures can be repurposed by replacing standard tubes with full-spectrum grow tubes designed for plants. The Barrina T5 grow light, while not ideal for fruiting plants, delivers decent PPFD values for leafy greens at close range and costs around $50 for a pack of multiple fixtures.
The primary advantage of this approach is modularity – you can connect multiple fixtures end-to-end or with included cables, making them perfect for wire rack shelving systems. While less powerful than purpose-built LED panels, these lights work well when positioned just 6-8 inches above seedlings or low-light herbs. For maximum effectiveness, add simple reflectors made from aluminum foil or mylar to redirect light that would otherwise be wasted. If you’re curious about the potential size of your plants, learn more about how big hydroponic plants can get.
LED Strip Light System ($40-80)
LED strip lights designed for plants offer an excellent balance of cost and performance when properly installed. By mounting high-density LED strips in aluminum channels with diffusers, you can create custom-length light bars perfectly sized for your growing area. Look for strips with a mix of red, blue, and white LEDs at a density of at least 60 LEDs per meter, ideally waterproofed to IP65 standards for humid growing environments.
The DIY aspect comes in customizing your fixtures – cutting strips to length, soldering connections, and mounting them in reflective channels. While this approach requires more assembly time than pre-built options, it allows precise control over your light coverage and spectrum. Complete kits including power supplies, aluminum channels, and high-quality plant-specific LED strips typically cost $60-80 for enough material to cover a 2’×4′ growing area.
Full-Spectrum Panel Lights ($80-150)
| Light Model | Coverage Area | PPFD at 18″ | Power Draw | Approximate Cost |
|---|---|---|---|---|
| Viparspectra P1000 | 2′ × 2′ | 400 μmol/m²/s | 100W | $70-80 |
| Mars Hydro TS1000 | 2.5′ × 2.5′ | 450 μmol/m²/s | 150W | $90-100 |
| Spider Farmer SF1000 | 2′ × 2′ | 470 μmol/m²/s | 100W | $140-160 |
For serious growers planning to cultivate fruiting plants or light-hungry herbs, quantum board or panel-style LED lights provide the best combination of efficiency and performance. These fixtures use Samsung or similar high-efficiency diodes arranged on aluminum boards with proper drivers and heat dissipation. While the upfront cost is higher than other options, their superior light output and electrical efficiency often make them more economical in the long run.
The Viparspectra P1000 represents an excellent entry point, delivering sufficient intensity for a 2’×2′ area at about $80. For larger growing areas, the Mars Hydro TS2000 covers a 3’×3′ space effectively while maintaining efficiency at around $180. These fixtures typically include built-in dimming capabilities, allowing you to adjust intensity based on plant needs or growth stage without changing the hanging height.
Light Positioning for Maximum Plant Growth

“Best Hydroponic Grow Lights | Pure …” from puregreensaz.com and used with no modifications.
Proper positioning of your grow lights dramatically impacts plant development. Unlike the sun, which moves across the sky providing different angles of light throughout the day, artificial lighting remains stationary, making positioning crucial for even growth. The primary factors to consider are height, coverage area, and light overlap between multiple fixtures.
Even the best grow lights become dramatically less effective if positioned incorrectly. Light follows the inverse square law – doubling the distance from your light source reduces intensity to one-quarter of the original value. This means small height adjustments can significantly impact the light energy reaching your plants. Balancing height for proper intensity while avoiding light burn requires regular monitoring and adjustment throughout the growing cycle.
Perfect Distance for Different Plant Stages
Seedlings and clones require gentle light to avoid stress during their delicate early stage. Position lights 24-30 inches above seedlings, gradually lowering them as plants develop stronger stems and larger leaves. During this stage, aim for PPFD values between 100-300 μmol/m²/s, increasing gradually as roots develop and plants establish themselves.
Vegetative growth stages benefit from moderate light intensity and higher blue spectrum content. Lights should be positioned 18-24 inches above plants, providing PPFD readings between 300-600 μmol/m²/s. This intermediate distance balances intensity with coverage area, encouraging plants to develop strong stems and lush foliage without stretching toward insufficient light.
Flowering and fruiting require the highest light intensity to produce satisfactory yields. Lower your lights to 12-18 inches above the canopy, aiming for PPFD values between 600-900 μmol/m²/s for most fruiting plants. At this stage, higher intensity red spectrum light triggers flowering hormones and encourages fruit development. Be vigilant for signs of light stress, including leaf curling or bleaching, which indicate your lights are too close or too intense.
Coverage Area Calculations
Determining proper coverage requires understanding the footprint of your specific lights. Most manufacturers provide PAR maps showing light intensity at different points beneath the fixture. As a general rule, your effective growing area extends to the points where light intensity drops below 50% of the center value. For quantum board style LEDs, this typically creates a usable footprint about 25% larger than the physical dimensions of the light.
Multiple lights should be arranged with approximately 25% overlap in their coverage areas to eliminate dark spots and ensure consistent growth across your garden. This means positioning lights so their effective edges intersect rather than aligning perfectly with each other. In rectangular growing areas, arranging lights in a grid pattern with this overlap consideration maximizes efficiency while maintaining even canopy development.
Setting the Right Light Schedule for Hydroponic Success

“Indoor Hydroponics Smart Garden for …” from happylittlestore.com and used with no modifications.
Plants respond not just to light quality and intensity but also to the duration of their light exposure. In nature, seasonal changes in day length trigger specific growth responses – a phenomenon you can manipulate in your indoor garden. Creating the optimal light schedule for your plants dramatically impacts growth rates, flowering times, and overall yields.
Light duration requirements vary significantly between plant types and growth stages. Understanding these differences allows you to program your timers for optimal results while avoiding unnecessary electricity usage. Proper scheduling also helps prevent stress responses like premature flowering or excessive stretch that can compromise your harvest quality.
Vegetative Growth Light Requirements
Most plants in vegetative growth thrive with 16-18 hours of daily light exposure. This extended “daytime” provides ample energy for photosynthesis while signaling the plant to focus on leaf and stem development rather than flowering. Leafy greens like lettuce and spinach can be maintained indefinitely in this vegetative state with extended light periods, allowing continuous harvesting of outer leaves while new growth emerges from the center.
For plants intended to eventually flower and fruit, maintain this 16-18 hour schedule until they reach approximately 70% of their desired size. The extended light period during vegetation allows plants to develop robust root systems and sufficient leaf area to support heavy fruiting later in their lifecycle. Some growers implement a gradual reduction in day length, decreasing by 30 minutes weekly to simulate natural seasonal changes and prepare plants for the flowering phase.
Flowering and Fruiting Light Needs
To trigger flowering in most fruiting plants, reduce the light period to 12 hours on and 12 hours off. This mimics the shorter days of late summer and fall, signaling plants to shift their energy from vegetative growth to reproduction. This 12/12 schedule must remain consistent – even brief light interruptions during the dark period can reset flowering hormones and delay harvest.
Some plants have specific photoperiod requirements that differ from this standard. Short-day plants like strawberries and chrysanthemums flower only when light periods are less than 12 hours, while long-day plants like spinach and cilantro may bolt (flower prematurely) unless provided with 14+ hours of light. Research your specific plants’ photoperiod requirements to optimize your timer settings accordingly.
Programming Your Timer for Automatic Light Cycles
Pro Tip: Set your lights to operate during off-peak electricity hours when possible. Running your system from 9pm to 3pm rather than 6am to 12am can reduce electricity costs by 10-30% in many areas with time-of-use billing without affecting plant growth.
Digital timers offer the most precise control over light schedules, allowing programming in 15-minute increments. For most home gardens, a simple on/off cycle is sufficient, though some advanced growers implement sunrise/sunset simulation by using multiple timers to activate different light banks sequentially. Program your timer to maintain absolute darkness during the off period – even brief light exposure can disrupt flowering plants’ hormonal cycles.
Consistency is crucial for proper plant development. Once you establish a light schedule, maintain it precisely throughout each growth phase. Abrupt changes to light duration can stress plants and trigger undesirable responses like stunted growth or reduced yields. When transitioning from vegetative to flowering light schedules, make the change cleanly rather than gradually to provide clear hormonal signals to your plants.
Troubleshooting Common DIY Grow Light Problems
Even well-designed grow light systems can develop issues that compromise plant health and productivity. Recognizing the early signs of lighting problems allows you to make adjustments before permanent damage occurs. Most lighting issues manifest in specific plant responses that serve as early warning signs if you know what to look for.
| Symptom | Probable Cause | Solution |
|---|---|---|
| Leggy, stretched stems | Insufficient light intensity | Lower lights or upgrade to higher output |
| Leaf curling upward | Excessive light/heat | Raise lights or reduce intensity |
| Pale upper leaves | Light bleaching | Increase light distance immediately |
| Uneven growth pattern | Inconsistent light distribution | Adjust fixture position or add reflectors |
The most common issues involve either too much or too little light reaching your plants. Both extremes cause stress responses that reduce growth and yield. By monitoring plant appearance daily and measuring light levels periodically, you can identify and correct problems before they significantly impact your garden’s productivity. Additionally, understanding hydroponic fertilizer NPK ratios can further enhance plant health and growth.
Dealing with Heat Issues
Heat Management Rule of Thumb: For every 100W of actual power consumption, provide at least 20 CFM of airflow across your grow light fixtures to prevent heat buildup. For more detailed advice, consider reading this guide on indoor grow lights.
Excessive heat remains the primary challenge with many lighting systems, particularly in enclosed growing spaces. Even energy-efficient LEDs convert approximately 40% of electricity to heat rather than light. This heat accumulates above plants, creating a temperature gradient that can stress upper growth or damage delicate flowers.
Active cooling using small circulation fans positioned to move air across light fixtures significantly reduces heat buildup. Position these fans to create cross-flow rather than blowing directly on plants, which can cause windburn or excessive transpiration. For larger setups, consider installing an exhaust fan near the top of your growing area to remove hot air while drawing in cooler replacement air from below.
Heat-resistant hanging hardware becomes critical when dealing with high-temperature fixtures. Standard plastic components can degrade over time when exposed to constant heat, creating potential safety hazards. Use metal hanging hardware or high-temperature silicone-coated materials that withstand prolonged exposure to the temperatures generated by your specific lighting system.
Fixing Uneven Light Distribution
Plants naturally grow toward light sources, resulting in uneven development when light distribution isn’t uniform. If you notice plants leaning or stretching in particular directions, your light coverage likely has dark spots or intensity variations. The simplest solution involves rotating plants regularly, but addressing the underlying light distribution provides better long-term results.
Adding simple reflectors dramatically improves light distribution by redirecting light that would otherwise be lost. For DIY solutions, mylar emergency blankets create excellent reflective surfaces when attached to cardboard panels positioned around your growing area. More permanent installations benefit from flat white paint (90% reflective) on surrounding surfaces or commercial reflective materials like Orca grow film.
Addressing Insufficient Light Intensity
If plants develop long internodes (stem sections between leaves), pale coloration, or reduced flowering despite proper nutrients, they’re likely receiving insufficient light energy. The immediate solution is lowering your lights to increase intensity, but this reduces your effective coverage area. For long-term resolution, either add supplemental lighting or upgrade to higher-output fixtures that provide adequate PPFD across your entire growing space.
Upgrading Your System as Your Garden Grows

“VG80 LED T5 Grow Lights For Seedling …” from www.mars-hydro.com and used with no modifications.
As your gardening experience develops, you’ll likely want to expand both the size and sophistication of your growing operation. Planning for future expansion during your initial build makes upgrades simpler and more cost-effective. The modular nature of DIY systems creates significant advantages over commercial all-in-one solutions when scaling up your indoor garden.
Rather than replacing entire systems, focus on incremental improvements that enhance specific aspects of your lighting. Adding supplemental lights to target flowering plants, incorporating spectrum-specific lights for certain growth phases, or implementing automated controllers that adjust light height and intensity automatically represent valuable upgrades that build upon your existing infrastructure rather than replacing it entirely. Remember that the best lighting system evolves with your growing experience, adapting to new knowledge and changing plant requirements rather than remaining static. For more insights, check out this guide on hydroponics explained.
Frequently Asked Questions (FAQ)
As you begin building your DIY grow light system, questions will inevitably arise about specific aspects of design, functionality, and plant requirements. The following answers address the most common concerns new indoor gardeners encounter when setting up their first lighting systems.
How much electricity will my DIY grow light system use?
To calculate electricity usage, multiply your lights’ actual power consumption (watts) by the number of hours they run daily, then divide by 1000 to get kilowatt-hours (kWh). For example, a 100W LED running 16 hours daily consumes 1.6 kWh per day or approximately 48 kWh monthly. At the national average electricity rate of $0.15 per kWh, this costs about $7.20 monthly per 100W of lighting.
Energy efficiency varies dramatically between lighting technologies. Modern LED fixtures typically deliver 2.5-3.0 μmol/joule efficiency, meaning they convert electricity to usable plant light far more effectively than older technologies. For comparison, fluorescent systems average 1.5-2.0 μmol/joule, while HPS systems typically manage 1.7-1.9 μmol/joule. This efficiency difference makes LEDs approximately 40% less expensive to operate than fluorescents for the same amount of plant-usable light. For more insights on optimizing your grow space, consider exploring grow tent temperature and humidity control.
Can I use regular household LED bulbs for growing plants?
Standard household LEDs produce primarily yellow and green wavelengths optimized for human vision rather than plant growth. While plants can grow under these bulbs, they develop slowly with stretched stems and reduced yields. Regular LEDs typically provide only 15-30% of the usable photosynthetic light of purpose-built grow lights at the same wattage.
If budget constraints necessitate using household bulbs, choose “daylight” LED bulbs with color temperatures between 5000K-6500K, which contain higher blue light percentages beneficial for vegetative growth. Position these bulbs much closer to plants than you would proper grow lights – typically 6-8 inches from the canopy. Even with optimal positioning, expect significantly reduced growth rates and yields compared to proper horticultural lighting.
The economics rarely justify household bulbs for serious growing. A 9W LED bulb produces approximately 800 lumens of light spread in all directions, while a 100W grow light delivers 15,000+ lumens concentrated on your plants with the specific spectrum they need. For the same electricity cost as running 10-12 household bulbs, you could operate a purpose-built grow light that delivers significantly better results. For more information on optimizing your setup, consider learning about the grow tent temperature and humidity controller.
Lighting Efficiency Comparison:
Standard LED Bulb: 0.5-0.8 μmol/joule
Fluorescent Grow Light: 1.5-2.0 μmol/joule
Modern LED Grow Light: 2.5-3.0 μmol/jouleIf you must use household bulbs temporarily, cluster multiple bulbs in reflective fixtures to concentrate their output and position them very close to plants. This approach works marginally for starting seedlings or growing low-light herbs but remains inadequate for fruiting plants or larger growing operations.
How do I know if my plants are getting enough light?
Plants provide clear visual indicators of their light satisfaction. Proper lighting produces compact growth with short spaces between leaf nodes, vibrant coloration, and robust stem development. Insufficient light causes elongated stems reaching upward, pale leaf color, and reduced flowering or fruiting. Too much light manifests as leaf curling, bleached spots on upper foliage, or brown crispy edges on leaves closest to lights. For those growing indoors, understanding the importance of temperature and humidity control can also help optimize plant health and growth.
Do different plants need different color lights?
Plant species have evolved different light preferences based on their native environments. Shade-tolerant plants like lettuce and herbs generally prefer higher proportions of blue light (400-500nm), which penetrates forest canopies more effectively in nature. These plants grow well under lights with color temperatures above 5000K, which produce a cooler, bluish light similar to open sky.
Sun-loving fruiting plants like tomatoes, peppers, and cannabis benefit from full-spectrum light with significant red content (600-700nm), which triggers flowering hormones and fruit development. These plants typically perform best under lights with color temperatures between 3000K-4000K, providing the warmer, reddish light similar to direct sunlight. For maximum productivity, some growers use adjustable spectrum lights that emphasize blue wavelengths during vegetative growth, then shift to increased red during flowering stages.
If growing multiple plant types under the same lights, choose full-spectrum white LEDs supplemented with additional red diodes. This combination provides adequate light for all plant types while ensuring sufficient red spectrum for proper flowering and fruiting. Position light-hungry plants directly under the center of fixtures where intensity is highest, with shade-tolerant varieties toward the periphery.
How long should my grow lights typically last before needing replacement?
Modern LED grow lights maintain 90% or more of their original output for approximately 30,000-50,000 hours of operation. For a system running 16 hours daily, this represents 5-8 years of practical use before significant light degradation occurs. Individual diodes may fail earlier, creating dark spots in your light coverage, but complete fixture replacement is rarely needed within the first 3-5 years of operation.
Fluorescent grow lights degrade more quickly, typically requiring bulb replacement after 10,000-20,000 hours (approximately 1.5-3 years of regular use). Their output gradually diminishes over time, necessitating more frequent replacement to maintain consistent light levels. This maintenance cost should factor into your initial technology choice when building your system.
To maximize fixture lifespan, maintain proper ventilation around lights to prevent heat buildup, avoid rapid on/off cycling which stresses electronic components, and keep fixtures clean from dust and moisture which can accelerate degradation. Quality drivers and heat management systems often determine longevity more than the LEDs themselves, making investment in reputable brands with proper engineering a worthwhile long-term decision.