Best Practices for Hydroponic Seed Germination: Four Factors

Key Takeaways
- Successful hydroponic seed germination depends on four critical environmental factors: water, temperature, oxygen, and light.
- Most hydroponic crops germinate optimally between 65-85°F (18-29°C), with specific plants like lettuce preferring cooler temperatures of 60-75°F (15-24°C).
- Seeds contain their own nutrients initially, so use pH-balanced water (around 6.0) without added nutrients until true leaves appear.
- The HydroBucket’s specialized seed pods provide ideal conditions for germination with proper moisture control and growing media.
- Maintaining high humidity with domes during germination and removing them once seedlings emerge prevents damping off and promotes healthy growth.
Why Most Hydroponic Seeds Fail (And How to Fix It)

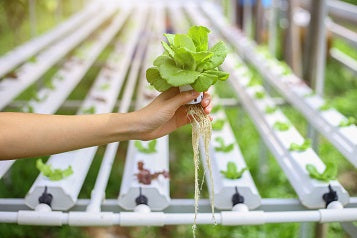
“What is a Seedling? — Area 2 Farms” from www.area2farms.com and used with no modifications.
Seeds fail to germinate in hydroponic systems for surprisingly simple reasons. The four environmental pillars of successful germination—water, temperature, oxygen, and light—must be precisely balanced for seeds to spring to life. When even one factor is off, germination rates plummet.
Most beginners make the critical mistake of drowning their seeds with too much water or nutrient solution. Unlike established plants, seeds actually require a delicate moisture balance and typically need no added nutrients during initial germination. Another common error is neglecting temperature control, with many growers keeping their germination environment either too cool or inconsistently warm.
The good news? Once you understand these four environmental factors and how to optimize them, your success rates can jump from disappointing to nearly 100%. Let’s dive into how to master each element for foolproof hydroponic seed starting.
Temperature: The Most Critical Factor for Seed Germination

“Tree Different Seasons: Over 29,738 …” from www.shutterstock.com and used with no modifications.
Temperature serves as the primary trigger for seed germination. Think of it as the alarm clock that tells a dormant seed it’s time to wake up and grow. Seeds contain enzymes that activate at specific temperature ranges, initiating the complex biochemical processes needed to transform from a dry seed into a living seedling.
Most hydroponic crops germinate best within the 65-85°F (18-29°C) range. This temperature sweet spot mimics the natural soil conditions of spring when many plants would naturally begin growing. When temperatures fall below this range, germination slows dramatically or stops completely. Conversely, excessive heat can damage delicate seed tissues or promote fungal growth.
Consistency matters as much as the actual temperature reading. Seeds respond poorly to temperature fluctuations, which can confuse their internal germination timing. A steady temperature within the optimal range sends clear signals to the seed that conditions are favorable for growth and development.
“Creating the right environment is crucial for successful seed germination. Most hydroponic crops thrive at temperatures between 65–85°F. Lettuce, for example, germinates best at 60–75°F and can sprout in just 2–3 days.” – The HydroBucket
Optimal Temperature Ranges for Different Hydroponic Crops
Different plant species have evolved to germinate at specific temperature ranges that match their native environments. Leafy greens like lettuce and spinach originated in cooler climates, which explains why they prefer temperatures between 60-75°F (15-24°C) for germination. These cooler-season crops actually experience decreased germination rates when temperatures climb too high.
On the other hand, heat-loving crops like tomatoes, peppers, and cucumbers—all native to warmer regions—require temperatures of 75-85°F (24-29°C) to trigger robust germination. At lower temperatures, these seeds either germinate very slowly or remain dormant. This temperature preference continues throughout their growing cycle, making them ideal summer crops in traditional gardening.
| Crop Type | Optimal Germination Temperature | Germination Time |
|---|---|---|
| Lettuce | 60-75°F (15-24°C) | 2-3 days |
| Spinach | 65-70°F (18-21°C) | 5-7 days |
| Tomatoes | 75-85°F (24-29°C) | 5-10 days |
| Peppers | 75-85°F (24-29°C) | 8-14 days |
| Cucumbers | 75-85°F (24-29°C) | 3-7 days |
How to Maintain Consistent Temperatures
Maintaining stable germination temperatures requires creating a microclimate around your seeds. Dedicated seedling heat mats provide the most reliable solution, offering thermostat-controlled warming that maintains temperatures within 1-2 degrees of your target. Place these waterproof mats under your germination trays, ensuring the heating element doesn’t directly contact water. For more tips on choosing the best seeds, check out our guide on choosing the right hydroponic seeds.
For larger operations, consider climate-controlled germination chambers that regulate both temperature and humidity. These professional-grade solutions offer precision control but come at a higher price point. Many commercial growers find this investment pays for itself through dramatically improved germination rates and predictable production schedules. For more insights on optimizing your setup, explore these requirements for a hydroponic system.
Monitor temperatures daily using a digital thermometer with a probe placed at seed level. Remember that ambient room temperature often differs significantly from the actual temperature at seed level, especially when using heat mats or under grow lights. For more insights on maintaining optimal conditions, check out these four tips for successful seed germination. Adjust your setup based on these measurements rather than room temperature readings.
3 Budget-Friendly Heat Solutions for Small Systems
Not everyone needs expensive equipment to achieve proper germination temperatures. For small-scale growers, placing seed trays on top of refrigerators or other appliances that generate mild heat can provide adequate warmth. The constant low-level heat emitted works particularly well for cool-season crops that don’t require high germination temperatures. For more tips on maintaining your hydroponic setup, check out our guide on how to keep hydroponic plants alive.
Another affordable approach uses incandescent light bulbs as heat sources. Place a 40-60 watt bulb inside a clay pot or metal can with ventilation holes, positioning it near (but not touching) your seed trays. This creates a gentle heat source that can raise temperatures by 5-10°F in a small area. Monitor closely to prevent overheating, and never let the light contact plastic trays or flammable materials. For more insights on maintaining optimal conditions, explore our guide to keeping hydroponic plants alive.
For the most budget-conscious solution, utilize passive solar heating by placing seed trays in a sunny window with southern exposure (northern exposure in the southern hemisphere). Cover trays with clear plastic to trap heat and create a greenhouse effect. This method works best during warmer seasons and requires moving trays away from windows at night to prevent temperature drops.
Moisture Management: Finding the Perfect Balance

“All plants need water. But how much and …” from woodlandswater.org and used with no modifications.
Water is perhaps the most counterintuitive element in seed germination. While hydroponics is water-based cultivation, seeds actually require a precise moisture balance rather than constant submersion. Seeds need to absorb water to activate internal germination processes, but too much water prevents them from accessing crucial oxygen. This delicate balance is often where new hydroponic growers struggle most.
The ideal moisture level for germination creates a humid environment where seeds can access both water and oxygen simultaneously. Think damp, not soaking—like a wrung-out sponge. Water should be available to the seed coat without waterlogging the growing medium. Different seed sizes require different moisture levels, with smaller seeds generally needing less direct moisture than larger ones.
The HydroBucket’s specialized seed pods excel here by providing the perfect moisture balance through carefully designed growing media. These pods allow water to wick upward to seeds without saturating them, creating that crucial moisture balance that’s so difficult to achieve manually. For DIY setups, achieving this balance requires more attention and possibly more frequent, lighter waterings.
The Soak-Drain-Mist Method for Better Results
For consistently successful germination, consider the three-phase soak-drain-mist method. Begin with a brief soaking period—usually 12-24 hours depending on seed size—to initiate the water absorption process. This awakens dormant seeds and triggers initial enzyme activity. Larger seeds like peas or beans benefit from longer soaking times, while tiny seeds like lettuce need just 6-12 hours.
After soaking, transfer seeds to your growing medium and allow excess water to drain completely. This drainage phase is critical as it prevents oxygen deprivation while still maintaining internal seed moisture. Once placed, switch to a misting regimen using a fine spray bottle, applying just enough moisture to keep the growing medium damp but never saturated. This approach maximizes both water availability and oxygen access.
For larger operations, automated misting systems with timers provide consistent moisture without manual intervention. These can be calibrated to deliver brief, frequent mists that maintain ideal conditions without overwatering. Remember that as seedlings emerge, their moisture needs gradually increase, requiring adjustments to your watering schedule.
Humidity Domes: When to Use and When to Remove
Humidity domes or clear plastic covers create microenvironments that maintain high moisture levels around germinating seeds. These transparent covers trap evaporating moisture, creating a humid environment that reduces the need for frequent watering and helps maintain consistent conditions. For most seeds, maintaining 70-90% relative humidity during germination significantly improves success rates.
However, timing dome removal is crucial. Once seedlings emerge, gradually introduce them to lower humidity by partially removing covers for increasing periods each day. Complete dome removal should typically occur when seedlings have their first true leaves (not the initial seed leaves or cotyledons). Failure to reduce humidity as plants develop can lead to damping off disease, a common fungal problem that causes seedling collapse.
For seeds that germinate at different rates, consider using domes with adjustable vents that allow for gradual humidity reduction. This accommodates both early and late-germinating seeds in the same tray. In commercial operations, moving seedlings to progressively lower humidity environments as they develop creates optimal transitions that strengthen plant structure. For more information on selecting the right seeds, visit our guide on choosing the right hydroponic seeds.
Warning Signs of Over-Watering
Over-watering manifests through several recognizable symptoms during germination. Seed coats may develop fuzzy white mold growth, indicating excessive moisture that’s promoting fungal development. Seeds may also darken and become soft without sprouting, signaling they’re rotting rather than germinating. In seedlings that have emerged, stems might appear thin and spindly at the soil line, often with a pinched appearance—the classic sign of damping off disease.
Warning Signs of Under-Watering
Under-watered seeds show equally clear distress signals. Seeds may appear to start germination but then halt development as moisture levels become insufficient. You might notice seed coats beginning to split or small root tips emerging, only to dry out and turn brown. Growing media will feel dry to the touch and may pull away from the edges of containers. Seedlings that do emerge often exhibit stunted, irregular growth patterns and may develop brown, crispy edges on their first leaves—a clear indication they’re struggling for adequate moisture.
Growing Medium: Choosing the Right Support
“What Are Hydroponic Systems and How Do …” from www.freshwatersystems.com and used with no modifications.
The growing medium serves as the seed’s physical support system while facilitating the perfect balance of water retention and aeration. Unlike soil which contains nutrients, hydroponic media function primarily as anchor points that hold moisture while allowing oxygen flow. The ideal medium provides structure without compacting, maintains consistent moisture without waterlogging, and allows easy root penetration as seedlings develop.
Different growing media offer varying moisture retention properties that can be matched to specific crop needs. Some seeds, particularly those from arid regions, perform better in quick-draining media like perlite or coarse vermiculite. Others, especially tiny seeds that dry out quickly, thrive in materials with higher water retention like coco coir or fine rockwool. Understanding these properties helps you select the best medium for specific crops rather than using a one-size-fits-all approach.
5 Best Growing Mediums for Hydroponic Germination
Rockwool cubes stand as the industry standard for hydroponic seed starting. Made from melted rock spun into cotton-candy-like fibers, these sterile cubes hold air and water in perfect proportion. Their uniform structure provides consistent germination results across large operations. However, rockwool requires pre-soaking in pH-adjusted water (5.5-6.0) to neutralize its naturally alkaline nature before use.
Coco coir, made from coconut husks, offers excellent water retention with good aeration. This sustainable medium mimics the natural germination environment many seeds evolved to prefer. It’s biodegradable, reusable for several cycles, and has natural antifungal properties that reduce damping off disease. The only downside is that it sometimes contains salt residue, making pre-rinsing important.
Starter plugs made from composted organic materials offer foolproof simplicity. Products like Rapid Rooters® combine peat moss, composted bark, and other materials into pre-formed plugs with perfectly-sized seed holes. These plugs maintain ideal moisture while allowing easy transplanting with minimal root disturbance. They’re particularly effective for beginners as they take the guesswork out of moisture management. For those new to this method, understanding the best growing medium for hydroponics can further enhance the success of your hydroponic system.
Vermiculite and perlite, often used in combination, create customizable growing media that can be tailored to specific crop needs. Vermiculite holds water exceptionally well, while perlite creates air pockets for oxygen flow. By adjusting the ratio between these components, you can create custom blends optimized for different seed types. A 50/50 mix works well for most crops, while water-loving seeds may benefit from a higher vermiculite ratio.
- Rockwool cubes: Excellent water/air balance, requires pH adjustment
- Coco coir: Sustainable, natural antifungal properties, good water retention
- Starter plugs: Foolproof design, easy transplanting, ideal for beginners
- Vermiculite/perlite mix: Customizable water retention, excellent aeration
- Oasis cubes: Clean, consistent results, great for automation systems

Pre-Treatment Steps for Different Mediums
Most growing media require specific preparation before use with seeds. Rockwool needs a thorough soaking in pH-adjusted water (5.5-6.0) for at least one hour to neutralize its naturally high pH and fully saturate the material. After soaking, gently squeeze excess water from cubes until they’re damp but not dripping—they should feel like a wrung-out sponge when ready for seeding.
Coco coir benefits from a thorough rinsing before use to remove potential salt residues from processing. For germination purposes, rinse coir with plain water until runoff is clear, then rehydrate with pH-adjusted water to around 6.0. Some growers prefer to soak coir in a very dilute calcium-magnesium solution (not regular nutrients) to prepare it, as coir naturally binds to calcium and can sometimes cause deficiencies in young seedlings.
Why pH Matters During Germination
The pH level of water used during germination directly affects a seed’s ability to access moisture and begin enzymatic processes. Most hydroponic seeds germinate best in slightly acidic conditions with pH between 5.8-6.2. This range optimizes the seed’s ability to absorb water through the seed coat and activate the internal biochemical processes needed for germination.
Improper pH can physically impede germination by affecting the seed coat’s permeability. When pH levels are too high (alkaline) or too low (acidic), the seed coat may not properly soften, preventing the emerging radicle (first root) from breaking through. This is particularly true for smaller seeds with thinner coats that are more sensitive to environmental pH.
Importantly, pH requirements during germination differ from those during later growth stages. While established plants need specific pH levels to optimize nutrient uptake, seeds primarily need appropriate pH to facilitate water absorption and enzymatic activity. Use pH-adjusted water without nutrients during germination, as seeds contain their own internal nutrient reserves to support initial growth until true leaves develop.
Light Requirements: When and How Much
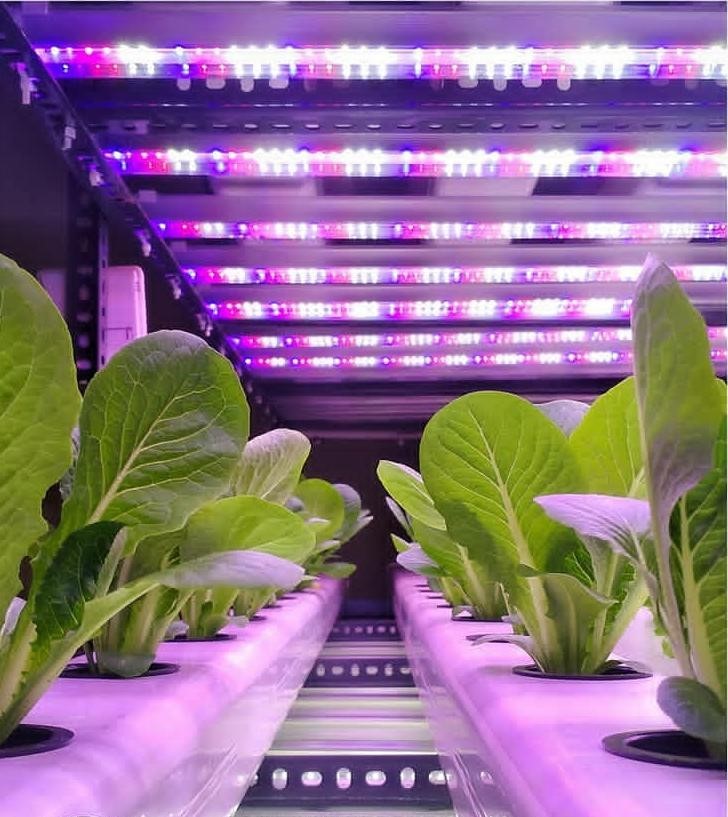
“Hydroponics Grow Light – Red blue …” from www.wehydroponics.com and used with no modifications.
Light plays a dual role in seed germination—it provides the energy for photosynthesis once seedlings emerge and, for some species, serves as a germination trigger. Understanding which seeds require light for germination and which prefer darkness can dramatically improve success rates. This photosensitivity evolved as a survival mechanism, helping seeds detect when they’re properly positioned near the soil surface.
As a general rule, very small seeds often require light to germinate, while larger seeds typically prefer darkness. This makes evolutionary sense—tiny seeds lack the energy reserves to push through deep soil, so they’ve evolved to germinate only when they detect light, indicating they’re near the surface. Larger seeds with more energy reserves often germinate better in darkness, mimicking their natural position slightly below soil level. For more on selecting the right seeds for your setup, check out this guide on choosing the right hydroponic seeds.
Light-Dependent vs. Light-Independent Seeds
Light-dependent seeds like lettuce, basil, and most herbs require exposure to light to trigger germination. These seeds should be placed directly on the surface of your growing medium rather than being buried. Cover them with clear humidity domes that allow light penetration while maintaining moisture. For these seeds, providing 14-16 hours of gentle light during germination significantly improves success rates and produces stronger seedlings. For more tips, check out four tips for successful seed germination.
Distance, Duration, and Intensity Guidelines
Once seedlings emerge, proper light management becomes crucial for preventing stretching and developing strong plant structure. Position grow lights 2-4 inches above seedlings, adjusting height as they grow to maintain consistent intensity. For standard LED grow lights, this close proximity provides adequate intensity without heat damage; for higher-powered lights or HIDs, increase this distance to prevent burning.
Duration matters as much as intensity for developing seedlings. Provide 14-16 hours of light daily, followed by a dark period. This photoperiod mimics optimal growing season conditions while giving plants necessary rest time for cell division and growth. Automated timers eliminate the need to manually manage light cycles and ensure consistency, which is particularly important during these early development stages when plants establish their growth patterns.

Budget Lighting Solutions That Actually Work
You don’t need expensive grow lights to successfully germinate seeds. Standard fluorescent shop lights or T5 fixtures provide adequate spectrum and intensity for seed germination at a fraction of the cost of specialized grow lights. Position these 2-4 inches above your seed trays and use chains or adjustable hangers to raise them as plants grow. The cool white spectrum (5000-6500K) these lights provide is perfect for seedling development.
For even more budget-friendly options, consider LED desk lamps or under-cabinet lighting strips positioned close to seed trays. These provide sufficient light for small-scale germination projects without significant power consumption. Look for options in the “daylight” spectrum range rather than “warm white” for optimal results. The key is positioning these lights very close to seedlings (1-2 inches) to compensate for their lower intensity compared to dedicated grow lights.
Many growers overlook the free lighting source—natural sunlight. A south-facing window (north-facing in the southern hemisphere) can provide excellent light for germination if you rotate trays daily to prevent stretching toward the light source. Supplement with basic artificial lighting on cloudy days or during winter months when daylight hours are shorter. This hybrid approach often produces the sturdiest seedlings while minimizing electricity costs. For those new to hydroponics, it’s essential to start with the right hydroponic seeds to ensure successful germination and growth.
Step-by-Step Germination Protocol That Works Every Time
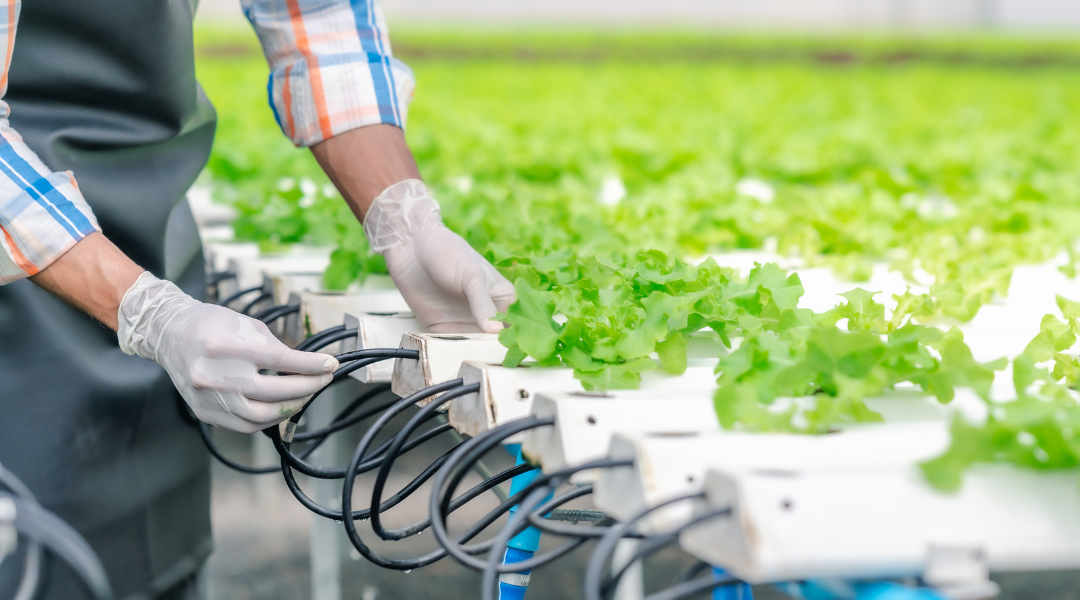
“Exploring Hydroponics’ Pros and Cons …” from hydronov.com and used with no modifications.
For consistently successful hydroponic seed germination, follow this proven protocol that addresses all four critical factors. Begin by selecting appropriate growing media for your chosen crops—rockwool cubes for most vegetables, coco coir for herbs, or starter plugs for beginners. Prepare your medium according to its specific requirements, ensuring proper pH adjustment and moisture levels before introducing seeds.
Place seeds at the correct depth—generally a depth equal to twice the seed’s diameter, with tiny seeds merely pressed onto the surface. Cover light-dependent seeds with clear humidity domes that allow light penetration while maintaining moisture. For dark-germinating seeds, cover trays with humidity domes wrapped in light-blocking material until sprouts emerge. Maintain temperatures between 65-85°F (18-29°C), using heating mats if necessary to achieve consistent warmth. For more information, explore the role of hydroponic seed pods in maintaining optimal growing conditions.
Water initially with pH-adjusted water (5.8-6.2) containing no nutrients. Seeds have internal food reserves and don’t require external nutrition until true leaves develop. Maintain consistent moisture through misting rather than soaking, checking daily for proper dampness. Once seedlings emerge, gradually reduce humidity by partially removing domes for increasing periods each day, while simultaneously introducing gentle airflow from small fans to strengthen stems. When seedlings develop their first true leaves, begin introducing a quarter-strength nutrient solution while transitioning them to your hydroponic system.
Frequently Asked Questions
The most common questions about hydroponic seed germination typically center around troubleshooting issues and optimizing conditions. New hydroponic growers often struggle with finding the right balance of environmental factors and understanding the unique needs of different seed varieties. The following FAQs address these core concerns with practical, actionable advice based on proven growing techniques.
Remember that while these answers provide general guidelines, observation and adjustment remain crucial skills for successful hydroponic growing. Pay close attention to how your seeds respond to conditions and be willing to make incremental changes based on their performance. Over time, you’ll develop an intuitive understanding of what works best in your specific growing environment.
How long does it take for seeds to germinate in hydroponics?
Germination times in hydroponic systems vary significantly by plant species, with some seeds sprouting in as little as 24 hours while others require two weeks or more. Leafy greens typically germinate quickly, with lettuce emerging in 2-3 days and spinach in 5-7 days when kept at optimal temperatures. Fruiting plants like tomatoes generally take 5-10 days, while peppers may require 8-14 days even under perfect conditions. Herbs show similar variation, with basil sprouting in 5-7 days while rosemary might take 14-21 days. Temperature plays a critical role in these timeframes—seeds germinate faster at the upper end of their optimal temperature range, so consistent warmth can accelerate the process significantly.
Do I need nutrients during the germination phase?
“In the first two weeks after planting, seedlings only need pH-adjusted water around 6.0 – they contain all required nutrients within the seed itself.” – Hydroponic Growing Guide
Seeds contain all the nutrients they need to germinate and develop their initial growth structures. Adding nutrients during germination can actually inhibit the process by creating osmotic pressure that makes water uptake more difficult for seeds. Use only pH-adjusted water (5.8-6.2) during the germination phase to create the ideal environment for seeds to sprout.
Once seedlings develop their first true leaves (not the initial seed leaves or cotyledons), they’ve depleted their internal nutrient reserves and require external nutrition. At this point, introduce nutrients at quarter-strength concentration, gradually increasing to half-strength over the next week. This gentle introduction prevents nutrient shock while providing essential elements for continued development.
For specialized crops or seeds with specific requirements, this general rule may vary slightly. For example, calcium-deficient growing media like coco coir may benefit from a very dilute calcium-magnesium supplement even during germination. However, for most crops and standard hydroponic media, plain pH-adjusted water remains the optimal choice until true leaves appear.
Can I germinate any type of seed hydroponically?
| Seed Type | Hydroponic Suitability | Special Requirements |
|---|---|---|
| Leafy Greens | Excellent | Light exposure for most varieties |
| Herbs | Excellent | Varies by species; some need light, others darkness |
| Fruiting Vegetables | Good | Consistent warmth (75-85°F) |
| Root Vegetables | Challenging | Special deep systems required for full development |
| Large Seeds (peas, beans) | Good | Pre-soaking recommended |
While most vegetable, herb, and flower seeds germinate successfully in hydroponic systems, some perform better than others. Leafy greens, herbs, and fruiting crops like tomatoes, peppers, and cucumbers excel in hydroponic germination, often showing higher success rates than in soil. These plants have relatively simple germination requirements and adapt readily to soilless culture once sprouted.
Root vegetables present more challenges for hydroponic germination. While carrots, radishes, and beets will germinate hydroponically, they require specialized deep water culture systems or media beds to develop properly. Their root structures, which are the harvested portion, often don’t form correctly in standard hydroponic setups. For these crops, dedicated root crop systems with adequate depth and support are necessary for successful production. To learn more about the role of hydroponic systems, check out this article on hydroponic seed pods.
Certain seeds with specialized dormancy requirements may need pre-treatment before hydroponic germination. Seeds requiring cold stratification (exposure to cold) or scarification (breaking or weakening the seed coat) will need these processes completed before placement in hydroponic media. Similarly, extremely hard-coated seeds like morning glory or moonflower benefit from overnight soaking or light sanding before hydroponic germination to ensure proper water absorption. For more insights on this, explore the role of hydroponic seed pods in hydroponic systems.
What’s the most common reason for seed germination failure?
Inconsistent moisture levels stand as the primary cause of germination failure in hydroponic systems. Seeds require continuous moisture to activate germination enzymes and sustain the process, but excess water prevents oxygen access, essentially drowning seeds before they can establish. This delicate balance is particularly challenging for beginners who tend to either keep media too wet or allow it to dry out between waterings. Using humidity domes and checking moisture levels daily helps maintain the consistent dampness seeds require without creating waterlogged conditions that promote rot and fungal issues. For those starting out, it’s crucial to focus on choosing the right hydroponic seeds to ensure successful germination.
Should I start seeds directly in my hydroponic system or separately?
For most hydroponic applications, starting seeds in a dedicated germination setup separate from your main growing system yields better results. Dedicated germination environments allow precise control of temperature, humidity, and moisture levels that newly germinating seeds require. These conditions often differ from what established plants need in a production system, making it difficult to optimize for both simultaneously in a single setup.
Use seedling trays with humidity domes or specialized propagation cubes for initial germination, maintaining the perfect microclimate for emerging seedlings. Once plants develop their first true leaves and reach approximately 2-3 inches in height, they’re ready for transfer to your main hydroponic system. This two-stage approach improves germination rates and produces sturdier seedlings better equipped to thrive once transferred.
For growers using nutrient film technique (NFT) or deep water culture (DWC) systems, direct seeding is particularly problematic as seeds can wash away or become waterlogged. Even in media-based systems like ebb and flow, the irrigation cycles optimized for mature plants often prove too wet for successful germination. The exception might be well-established wicking systems where the upper portion of the growing media maintains appropriate moisture levels for germination while still connecting to the nutrient reservoir below.
- Dedicated germination environments provide optimal temperature control
- Separate setups allow for proper humidity management during early stages
- Two-stage growing prevents nutrient exposure before seeds are ready
- Seedling-specific lighting can be optimized for early growth stages
- Transfer timing can be tailored to individual plant readiness rather than system schedules
Successful hydroponic seed germination comes down to understanding and controlling these four critical environmental factors. By creating the perfect balance of temperature, moisture, growing medium support, and appropriate light, even novice growers can achieve professional-level germination rates. Start with quality seeds, provide these optimized conditions, and you’ll build the foundation for a productive hydroponic garden with robust, healthy plants.
The HydroBucket’s specialized seed pods and comprehensive growing systems take the guesswork out of hydroponic germination, providing ideal conditions for seeds to thrive from day one all the way through harvest. Visit us at thehydrobucket.com to discover how our innovative systems can elevate your hydroponic growing experience with precision-engineered solutions for every stage of plant development.